Joomla: Who’s Online Module – wrong number of guests

If you find that the “Who’s online module” is showing more users online that actually is this should fix it.

Go to > /modules/mod_whoisonline/helper.php

Change:
$query = ‘SELECT guest, usertype, client_id’ .
‘ FROM #__session’ .
‘ WHERE client_id = 0′;

To:
$datenow = date(“Y-m-d H:i:s”);
$time_string = strtotime($datenow);
// Modified query below to only show members/users active in the last 10 minutes
$extra_time = 600; //example: 10 min x 60 sec
$online_time = ($time_string-$extra_time);

$query = “SELECT a.guest, a.usertype, a.client_id”
.”\n FROM #__session AS a”
.”\n WHERE a.client_id=0 AND a.time>’$online_time’”;

Now Change:
$query = ‘SELECT DISTINCT a.username’ .
‘ FROM #__session AS a’ .
‘ WHERE client_id = 0′ .
‘ AND a.guest = 0′;

To:
$datenow = date(“Y-m-d H:i:s”);
$time_string = strtotime($datenow);
// Modified query below to only show members/users active in the last 10 minutes
$extra_time = 600; //10 min x 60 sec
$online_time = ($time_string-$extra_time);

// New Query below to only show members/users active in the last 10 minutes
$query = “SELECT DISTINCT a.username, a.userid, u.name”
.”\n FROM #__session AS a, #__users AS u”
.”\n WHERE (a.userid=u.id) AND (a.guest = 0) AND (NOT ( a.usertype is NULL OR a.usertype = ” )) AND a.time>’$online_time’”
.”\n ORDER BY “.(($ueConfig['name_format'] > 2) ? “a.username” : “u.name”).” ASC”;

Share
Posted in Joomla | Leave a comment

Joomla: 403 – You are not authorised to view this resource.

You might sometimes get the following error when clicking on a menu link:
403 – You are not authorised to view this resource. You may not be able to visit this page because of:
1.an out-of-date bookmark/favourite
2.a search engine that has an out-of-date listing for this site
3.a mistyped address
4.you have no access to this page
5.The requested resource was not found.
6.An error has occurred while processing your request.
Please try one of the following pages:
•Home Page
If difficulties persist, please contact the System Administrator of this site.

Go to joomla backend > Sections > Make sure none of the sections’ Access Level‘s are set to registered.

403 – You are not authorised to view this resource.

You may not be able to visit this page because of:

  1. an out-of-date bookmark/favourite
  2. a search engine that has an out-of-date listing for this site
  3. a mistyped address
  4. you have no access to this page
  5. The requested resource was not found.
  6. An error has occurred while processing your request.

Please try one of the following pages:

If difficulties persist, please contact the System Administrator of this site.

Share
Posted in Joomla | Tagged , , , | 4 Comments

Set up email account outlook express

Settings needed for an Email Account in Outlook Express

Outlook ExpressTo ensure that Outlook Express will be able to connect to your email account, check the email account settings below, needed to set up new email accounts in Outlook Express.
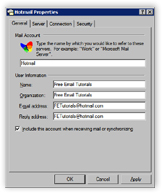
Standard email settings in Outlook ExpressStandard email account settings are: user name and password, email address (sometimes used as user name as well), “port” numbers (nearly always the ones we use in the sample email account below).

Although rarely, some email providers require “secure authentication”: Outlook Express would then use a secure (encrypted) connection to authenticate itself to the email server.

1. Setting up an Email Account in Outlook Express
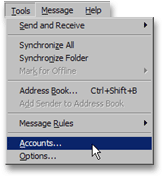
Pulling up email accounts in Outlook ExpressThe new email account wizard will automatically open the first time you run Outlook Express. It is however possible to setup a new or additional email account in Outlook Express after the fact.

To manually setup or add an email account in Outlook Express, go to the Tools menu, and click Accounts to access existing email and news accounts, from where you can add email accounts.

If the new email account wizard opens automatically, simply proceed with the new email account setup below.
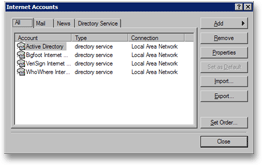
Email accounts in Outlook ExpressThe Internet Accounts dialog will open, and display all accounts (email and other) you currently have setup in Outlook Express.

By default, you should have four “directory services” listed under “All” – these are not related to your email accounts.

(If you already had email accounts setup in Outlook Express, they would be listed both under the All and the Mail tab.)

The Internet Accounts dialog is the central location from which you can add, remove, or modify email accounts, as well as import or export email accounts in Outlook Express.

2. Creating or Adding a New Email Account in Outlook Express
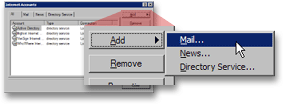
Adding a new email account in Outlook ExpressTo create and setup a new email account in Outlook Express, click the Add button with an arrow, and choose Mail.

The email account setup wizard will now lead you through the email account setup process.
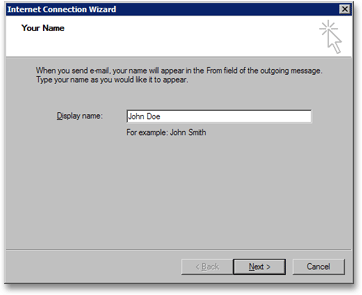
Setting up a new email account in Outlook ExpressThe Internet Connection Wizard will open. This wizard will guide you through all the steps needed to setup an email account in Outlook Express.

The first field is the Display Name: type in it your name, as you would like it to appear to recipients when you send emails from Outlook Express. This information can be changed later on, after you have finished setting up your email account.

Click the Next button to proceed with the creation of your new email account.
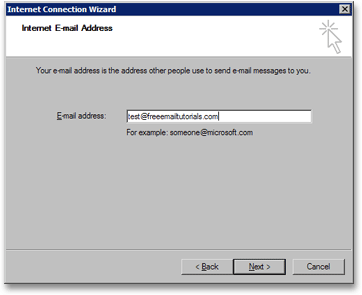
Enter your email address for Outlook Express' new email accountThe wizard’s second screen, Internet E-mail Address, allows you to enter your actual account’s email address.

Your email address, as it should be entered, is composed of two parts: the “user name”, which is the part that comes before the “@” sign, and the “domain name”, which is the part that comes after the “@”, like yahoo.com, hotmail.com, aol.com, etc.

Your email address will also be used by Outlook Express as your email account’s user name, but this can be changed later, from the email account properties. (Outlook Express automatically uses your email address as user name because most email providers follow this convention.) — Click Next to configure your email account’s mail servers.

3. Setting up a POP3 Email Account in Outlook Express
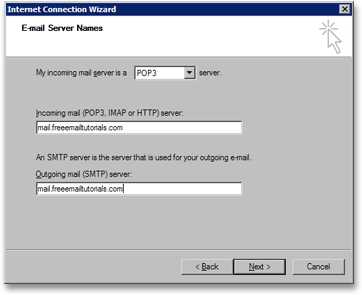
Setting up email server names in Outlook ExpressIn the E-mail Server Names, Outlook Express collects the incoming and outgoing email server names, and the type of email account you try to setup.

mail.emailDomain.com is the most common form of mail server name, where emailDomain.com is your email provider’s domain.

In most cases, these will contain your email domain name. In some cases, your email provider may ask you to use an “IP Address”, which Outlook Express will also accept.

The most frequent type of email account is POP3
In most cases, your incoming and outgoing mail servers are mail.email.com, where email.com is your email account’s domain name (the part that comes after the “@”), that Outlook Express will use to “talk” with the email server.

Show a technical digression, or Click the Outlook Express Email Account Setup Wizard’s Next button.
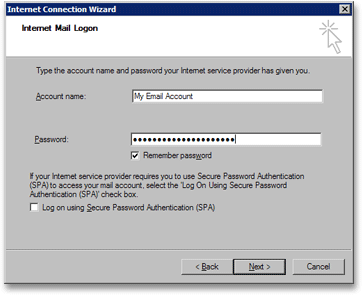
Enter your email account name in Outlook ExpressThe Internet Mail Logon is Outlook Express’ last screen in the creation of a new email account.

In the Account Name field, Outlook Express lets you give a friendly name to the email account you have just setup. “Work Email” or “My Email” would be examples. Outlook Express will display this email account name, and use it whenever it refers to it.

In the Password field, Outlook Express is requesting the password needed to access your email account. Outlook Express can optionally remember your email account password for you. This will spare you from having to type it whenever Outlook Express checks for new emails on the server.

By default, Outlook Express will use your email server name as “friendly” name for the email account you just set up.
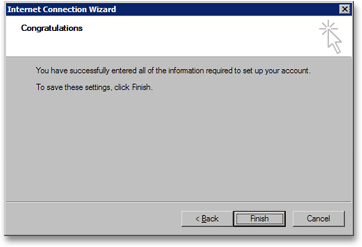
Outlook Express has completed the email account setupCongratulation – you have setup an email account in Outlook Express.

Click the Finish button, and you will return to Outlook Express’ Internet Accounts dialog, from which you created your email account in the first place.

Click the Properties button to tweak your new email account’s settings.
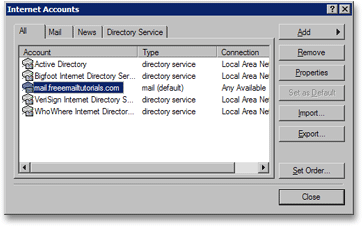
Outlook Express has added the email account you have just finished setting up

4. Configuring New Email Accounts in Outlook Express

You have just created a new email account in Outlook Express. The email account settings you provided during the email account setup are nearly always enough for Outlook Express to connect to your email account.

Share
Posted in Microsoft Windows, Outlook Express | Leave a comment

Upgrade Sobi2

Uninstall Old Version

* Remove all plug-ins using the Sobi2 plug-in manager. Don’t remove the database tables for the plug-ins.
* Uninstall the component using the Joomla! Extension Manager (Extensions -> Install/Uninstall -> Components).

Install New Version

* Install your new Sobi2 version using the Joomla! Extension Manager Install function.
* Install all plugins using the Sobi2 plug-in manager.
* Replace any files that you had customized (language, templates etc.).

Detailed Update Instructions

Prepare for Update
All database tables are preserved so your custom fields, categories, entries and email templates are kept. However there are a few customizable files for Sobi2 that you may want to save before upgrading (only if you made some changes in these files):

* Details template – /components/com_sobi2/templates/default/sobi2.details.tmpl.php (versions below RC 2.8.3 in folder /components/com_sobi2/)
* V-Card template – /components/com_sobi2/templates/default/sobi2.vc.tmpl.php (versions below RC 2.8.3 in folder /components/com_sobi2)
* Style Sheet (CSS) – /components/com_sobi2/includes/com_sobi2.css
* Language file(s) – /components/com_sobi2/languages/*.php (always use the newest version of default.php!)
* Configuration file – /components/com_sobi2/includes/inc/config.ini

For many users this is all that would have changed. Some of you may have modified or created addition files used by a plug-in or template and these should be saved as well.

* Styles Sheets for plugins (CSS) – /components/com_sobi2/plugins/<plugin name>
* Language file(s) for plugins – /components/com_sobi2/plugins/<plugin name>
* Other files in components folder – all other files you have copied to the Sobi2 components folder, like your own backgrounds or template images. The whole components folder will be delete on update.

Since plug-ins will be uninstalled, make sure you have all plug-in installers available.

System Backup
For production sites, it is always best to complete a full database and file system backup before making any major changes, including this update.

Change Sobi2 Menu Link
If this is on a production site, you will want to hide the menu item linking to Sobi2. First, create a static content item stating that your business index will be off-line temporarily, and then create a menu link to this static item with the same name/location as your SOB2 menu link. Finally, unpublish your menu link to Sobi2.

Remove Sobi2
Any plug-in’s that have been added must be uninstalled. All database information regarding the plug-in will be saved. Use the Sobi2 plug-in manager and remove all installed plug-ins.
When ready, use the Joomla! Extension Manager (Extensions -> Install/Uninstall -> Components) to uninstall the Sobi2 component.

Install new version of Sobi2
Once the you have backed everything up, and the old version of Sobi2 has been uninstalled, you are ready to install the new version

1. Use the Joomla! Extension Manager (Extensions -> Install/Uninstall -> Components) to install the new version
2. Install any plug-ins that were previously installed
3. Replace any files that were saved while preparing for the update. Please note that some files, such as the CSS file, may have been changed in the update. Please see all documentation for the new version to see what has changed.
4. As the Administrator, test your front-end and back-end, and then modify your menu items accordingly

http://www.sigsiu.net/upgrading.html

Share
Posted in Business Directory, Joomla | 1 Comment

How to fetch geo coordinates in add/edit entry form

Create custome text field and add below code.

<script src="http://maps.google.com/maps?file=api&v=2&key={googleApiKey}" type="text/javascript"></script>

<div id="map" style="width: 500px; height: 340px"></div>

<p><span>Type your address:</span> <input type="text" size="43" id="address" value="Street, City" />
<input type="button" value="Search" onclick="showAddress()" /></p>

<script type="text/javascript">

//<![CDATA[

var start_latitude = "62.103882522897855";
var start_longitude = "20.56640625";
var zoomlevel_add = 3;
var zoomlevel_edit = 15;

var lat = document.getElementById('field_latitude').value;
if (lat == "")
lat = start_latitude;
var lng = document.getElementById('field_longitude').value;
if (lng == "")
lng = start_longitude;
if (lat == start_latitude)
zoomlevel = zoomlevel_add;
else
zoomlevel = zoomlevel_edit;

if (!GBrowserIsCompatible()) {
alert('Sorry, your browser don\'t support Google Maps.');
}

var map = null;
var geocoder = null;
var marker = null;

// Build map
map = new GMap2(document.getElementById("map"));
map.addControl(new GLargeMapControl());
map.addControl(new GMapTypeControl());
map.addControl(new GScaleControl());
map.addControl(new GOverviewMapControl());
map.setCenter(new GLatLng(lat, lng), zoomlevel);
geocoder = new GClientGeocoder();

if (lat == start_latitude) {
function showAddress(address) {
var address = document.getElementById("address").value;

if (geocoder) {
geocoder.getLatLng(
address,
function(point) {
if (!point) {
alert("Sorry, but we couldn\'t locate " + address + ".");
} else {
var lat = point.lat();
var lng = point.lng();
map.setCenter(new GLatLng(lat,lng), zoomlevel_edit);

if (marker) map.removeOverlay(marker);
marker = new GMarker(point, {draggable: true});
document.getElementById("field_latitude").value = point.lat();
document.getElementById("field_longitude").value = point.lng();

GEvent.addListener(marker, "dragstart", function() {
map.closeInfoWindow();
});

// Display coordinates when marker is dragged
GEvent.addListener(marker, "drag", function() {
document.getElementById('field_latitude').value = marker.getPoint().y;
document.getElementById('field_longitude').value = marker.getPoint().x;
});

// Open infowindow when dragging stops
GEvent.addListener(marker, "dragend", function() {
marker.openInfoWindowHtml("This is the new position!");
});

map.addOverlay(marker);
marker.openInfoWindowHtml("<div style='width:200px; height:100px;'>" +
"<strong>Check the position of the marker!</strong>" +
"<br /><br />" +
"If it's wrong, then drag and drop the marker to the correct position!" +
"</div>");
}
}
);
}
}
} else {

// Add marker
var point = new GLatLng(lat,lng);
var marker = new GMarker(point, {draggable: true});
map.addOverlay(marker);

// Display coordinates when marker is dragged
GEvent.addListener(marker, "drag", function() {
document.getElementById('field_latitude').value = marker.getPoint().y;
document.getElementById('field_longitude').value = marker.getPoint().x;
});

// Open window when dragging stops
GEvent.addListener(marker, "dragend", function() {
marker.openInfoWindowHtml("Position of the marker has been changed!");
});
}
//]]>

</script>

Share
Posted in Business Directory, Joomla | Leave a comment

Social Media: How to handle Negative, Rude or Deceitful Comments

How does one handle negative comments or outright lies being posted on social platforms across the web? This is becoming a greater and greater concern and the root problem is that social media cannot truly be “controlled”.

The best defense is of course a good offense. Providing consistent company information and keeping engaged with your community can go a long way towards building and retaining loyalty even under attack.

But what happens when your brand is targeted from competitors, political or environmental groups and the negative impacts begin to take on a life of their own?

The first rule is to remain calm! Do not respond immediately, do not try to stop the discussions.

Read through all of the comments and take the necessary time to thoroughly understand the issue or issues being raised. Research within and beyond your company and gather factual, accurate information about the true situation. Honesty and accuracy are your best weapons.

Once you have all of the facts it is important to be transparent. Do not defend your brand but do offer up accurate, factual information for those who wish to learn more. You may want to create a special page on your website that includes factual information and links to other documents or public information including better business ratings, the company guide to business conduct, ethical practices statements, public financial records etc. about your company that would get the real facts circulated.

If you discover there is a partial truth contained within the lies admit any error on the part of your brand. Stress that the company wants to be responsive to their community’s concerns and takes them seriously. Follow that up with what steps your company is taking to deal with the issues and remedy the situation. Keep your community informed regarding your progress.

Another option to counteract incorrect or false information about your brand is to consider providing a special phone number (hotline) community members can call for additional information.

The goal of such steps is merely to provide open, factual information and allow your community to see that your brand is committed to transparency for their constituents.

Make certain that the reputations of your employees who are responsible for social media within your company are spotless-personally and professionally. You want your brand represented by professional, ethical, honest and caring people.

Anyone that does not rise to this level of professionalism should be reassigned away from any social media activity on behalf of the company.

Always put your best face forward in social media. You do not want to provide detractors with any ammunition they can use against you.

Rely on your loyal customers and fans to help set the record straight. Know and develop strong relationships with your influencers and customers. Let them help you balance the playing field by posting related positive comments and links to information that addresses the facts of an issue. If they have a personal experience that contradicts the issue being raised encourage them to share it.

If negativity is high it may be a good time to add additional video testimonials to your site or a video that addresses current events affecting your company. This provides yet another way of providing disseminating factual information to the community indirectly without posting anything defensive on social platforms.

Some of the things you must avoid are postings that appear to be defensive – regardless of whether they are true or not.

Do not make negative comments about any company or person who posted negative comments about your brand. This begins a campaign of mud-slinging that will only further hurt your brand. It is non-productive and will not be received well by the community.

Do not pull your social media pages. Do track and use daily alerts so you can monitor comments and stay on top of the chatter. If something negative is posted, deal with it quickly (after doing your due diligence) to avoid it escalating into something big.

About the Author: Jeff Beale – Mr. Marketology. Provided by Internet Marketing Consultant. More marketing advice at http://www.mrmarketology.com/.

Share
Posted in facebook, twitter, Website Marketing | Tagged , | Leave a comment

No horizontal scroll-bar at the bottom of the page

Solution:
In style-sheet > change: overflow: hidden; to overflow: visible;
#art-main
{
position: relative;
/*overflow: hidden;*/
overflow: visible;
z-index: 1;
width: 100%;
left: 0;
top: 0;
cursor:default;
}

Share
Posted in Artisteer, Joomla | Tagged , | Leave a comment

Joomfish – 500 – No valid database connection:

When editing article in the front end I sometimes get a “500 – No valid database connection:” error.

1. Backup site using akeeba backup

2. Joomla backend > Global Configuration > Server > Database settings (right colomn) > Change the database setting from mysql to mysqli > Save

3. Test

Share
Posted in Joomfish, Joomla | Leave a comment

Change Collation from latin1_swedish_ci to utf8_general_ci using Akeeba backup

An easy way to change the collation if you are cloning your website to another server using Akeeba backup is to use the setting > Fine settings > Force Utf8

Share
Posted in Joomla, MySQL - phpMyAdmin, Website Hosting | Leave a comment

Fatal error: Maximum execution time of 120 seconds exceeded in \tool_phoca_changing_collation\index.php on line 91

If you are using the the phoca collation tool OR get Fatal error: Maximum execution time of 120 seconds exceeded errors when running scripts do the following:

Try these different settings in C:\wamp\bin\apache\apachex.x.x\bin\php.ini

Find:
post_max_size = 8M
upload_max_filesize = 2M
max_execution_time = 30
max_input_time = 60
memory_limit = 8M

Change to:
post_max_size = 750M
upload_max_filesize = 750M
max_execution_time = 5000
max_input_time = 5000
memory_limit = 1000M

Then restart wamp to take effect. Run the script and change it back.

Share
Posted in Joomla, wamp server, Website Hosting | Tagged , , , , | Leave a comment